This website uses cookies so that we can provide you with the best user experience possible. Cookie information is stored in your browser and performs functions such as recognising you when you return to our website and helping our team to understand which sections of the website you find most interesting and useful.
When installing a new spring in the ToolStand, do I need to pre-tension the spring?
Yes. you will need to pre-tension the spring by two turns in a counter-clockwise direction. Please be sure that the cover plate is re-installed before pulling down on the lever.
What type of grease can be used to lubricate the guide bars of the DrillMate?
Common lithium grease.
Can I make template inserts for the Design/InlayKit?
Yes, template inserts can be made that fit into the black frame. We recommend using 1/4” Baltic birch or particleboard. You would then need to stencil your design and cut it to fit with a jigsaw.
Will DrillPump operate with siphon flow?
No, the DrillPump will not operate with siphon flow, the drill needs to be on.
Does the DrillPump need to be mounted?
Yes, the DrillPump must be mounted for operation.
What is the max temperature of liquid that can be pumped with DrillPump?
Do not convey hot liquids above 104°F (40°C)
Are there substances that cannot be pumped with DrillPump?
Do not convey poisonous, corrosive, or flammable substances such as petrol, kerosene, nitro compounds, explosive materials, or drinking water
When routing the inside of open letters, it is possible to get a flat surface?
Yes. It is recommended to make a full pass with the core box bit along the inside edge of the letter template. Then switch to ½” router bit with a bottom-cutting flute to get a flat surface. Light sanding may still be needed.
What is the best way to set-up the Pantograph?
For instruction and material list, please see page 5 of the product manual for more information.
How do I make signs that standout?
- If you are painting your sign, almost any wood species will do
- For clear finished signs, laminate two contrasting wood species, such as padauk-on-maple (best for indoor use)
- For outdoor signs, choose cedar, redwood, or white oak (these species resist rot)
- After routing signs, use spray paint for a quick way to add contrast, plane or sand after the paint dries
- Don’t apply a clear-film finish to outdoor signs; the sun’s ultraviolet rays will cause it to discolor and peel
- Use pigmented deck finish or leave outdoor signs bare and allow it to weather naturally
How do I rout characters with inner fields?
When routing letters and numbers with inner fields (A, B, D, O, P, Q, R, 6, 8, 9, and zero), hold the guide bushing tightly against the other perimeter of the template as you rout. Even a slight wandering off the template wall could result in a botched character. It is best to use a test piece first.
What bits can I use for sign making?
- 1/4″ and 3/8″ round nose bits are the standard sizes
- 1/2″ round nose bit adds greater depth and width to the characters
- V-groove bits create beveled sidewalls.
- Straight bits leave perpendicular sidewalls that add shadows for more contrast
How do I use both sizes of letter templates with one sign?
If you have two routers, set one up with ¼” router bit and 7/16” bushing, and the other with 3/8” (or ½”) and 5/8” bushing. This will allow you to complete the routing without stopping and changing.
How do I paint or finish my signs?
Painting or Finishing Signs – Helpful Hints:
Spray paint the entire workpiece after it has been routed. After the paint is dry, sanding the entire sign with a belt sander will remove the paint from the high spots and leave paint in the areas that have been routed. Be sure to sand the workpiece evenly.
Place Tuck Tape, or another sheathing tape, over the surface that you want to rout out. The router cuts through the tape and into the workpiece. After routing is complete, spray paint over the lettering, (usually two coats) and once dry, remove the tape. This can be done with the help of a shop knife or Exacto blade. This method cuts down on sanding.
Why can’t I turn the shaft on my Drill Pump by hand?
The DrillPump will need to be chucked to a drill before the shaft will turn.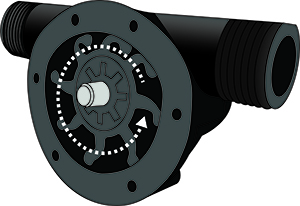
To ensure the pump is working properly, this can be tested by mounting the pump to a board or putting it into a vice.
Do not hold the pump in your hand while testing.
What direction do you run the drill to operate the DrillPump?
The drill should be set to run forward, turning the pump in a clockwise direction.
The arrows on the drill are for the flow direction.
Never run the DrillPump in reverse.
What type of grease should I use on the Pantograph?
If the joints of the Pantograph are stiff, you may use a common lithium grease.
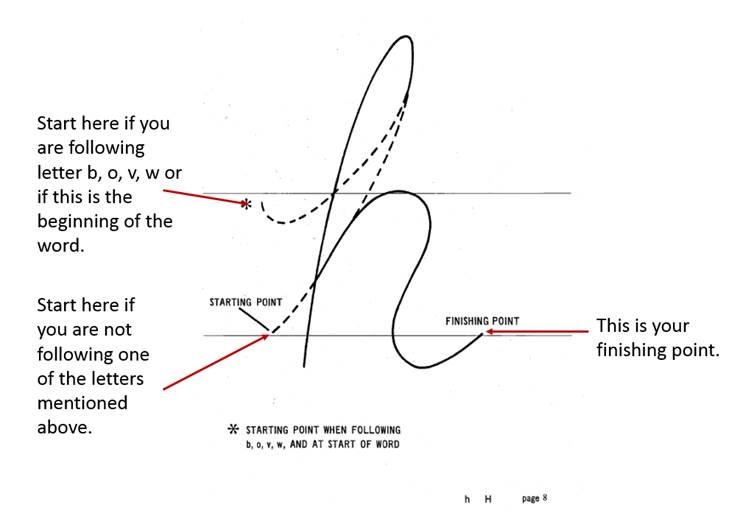
What do I use for the starting and finishing points for the Modern font?
Since these letters are cursive, the starting locations will vary based on the letters that precede them. Each lower case letter will be started based on the “starting point” that is specified unless they are preceded by a letter that is called out on that page. If that is the case, you will at the beginning of the dotted line near the asterisk.
Example:
Do I have to use a plunge base router with the SignCrafter™ or SignPRO™?
It is not required to use a plunge base router with this kit. Below you will find information on using both types of routers so you can see the difference in operation.
If using a fixed base router:
Lower router bushing into letter opening. With bushing in contact with the inside of letter opening and router bit above wood (NOT TOUCHING), start router motor. Lower bit into the wood until router base is resting on both rails. The router bushing traces around the letter opening. When the letter is complete, turn the router off. When the motor stops, remove router. Proceed to engrave all letters in the template assembly.
If using a plunge router:
Lower router bushing into letter opening. With bushing in contact with the inside of letter opening and router bit above wood (NOT TOUCHING), start router motor. Lower bit into the wood. The router bushing traces around the letter opening. When the letter is complete, raise router bit. Stop the router motor. Proceed to engrave all letters in the template assembly.
What is the Offset Base used for?
The Offset Base is used for routing the edges of your workpiece.
Can the DrillMate be secured to a board?
The DrillMate can be secured to a wood board. It also has non-slip TPE feet, which prevents slipping and marring on the work surface.
Can I use the DrillPump to pump drinking water?
No, this product contains grease and therefore is not food safe.
Can I create my own stencils for the Pantograph?
It is possible to create your own stencils. This gives you the flexibility of different fonts and different sizes. Please visit the following link for more information on how to accomplish creating your own stencils.
How do I prevent marring my pen tip during assembly, using the PenPress?
To prevent marring your pen tip during assembly you will want to use a rubber piece over the pen locator (black plastic stop). You can also turn your pen around and assemble backwards, please be sure to use a wooden cut out block on the end with threading to prevent damage to the threads.
Creating templates for the SignCrafter™ & SignPRO™
The material you will need to purchase is a polycarbonate material that is 3/32” thick x 4” wide and will need to be cut down to 3-1/4” to fit into the frame of the jig.
You will then need to draw or stencil the desired character onto the material and then cut it out. This will allow you to create a character to your desired height
How do I grease the DrillPump300?
After every use apply a small amount of silicone grease. To apply, remove the black housing screws and cover, and put a bit of grease on the housing where the rubber fan blades touch, then reassemble.
Any spray lubricants, such as WD-40, are not recommended, as they do not provide sufficient lubrication for this product and can cause damage to the internals of the pump.
How do I grease the DrillPump750?
After every use apply a small amount of silicone grease. To apply, remove the black housing screws and cover, and put a bit of grease on the housing where the rubber fan blades touch, then reassemble.
Any spray lubricants, such as WD-40, are not recommended, as they do not provide sufficient lubrication for this product and can cause damage to the internals of the pump.
How do I keep my letters from falling out of the rails?
It is recommended that you use a support bridge even with signs that are 18” or less. You may also find it beneficial to clamp down the support bridge to ensure that the letter templates do not come lose while you are routing.
Does the bushing need to be installed on the BasePlate before I begin routing the work-piece using the SignCrafter or SignPro?
Please make sure that the bushing is installed on the TurnLock™ BasePlate before you begin routing your project. This will ensure that your router bit does not come in contact with your templates.
Do you offer rails for the SignCrafter & SignPro that are longer than 18″?
Rails can be custom cut to the desired length. Please contact Milescraft Customer Service by phone or email, and we would be happy to assist you with your custom rails.
Can I use the same guide bushing and router bit for both the 1-1/2″ & 2-1/2″ templates?
When routing signs using the 2-1/2″ templates, you will want to use the 3/8″ LR Router Bit with a 5/8″ Guide Bushing.
When routing signs using the 1-1/2″ templates, you will want to use the 1/4″ LR Router Bit with a 7/16″ Guide Bushing.
You can purchase a 1/2″ bit (#2213) and use this with the 2-1/2″ templates to create ‘bold’ letters.
For your convenience guide bushings and router bits can be purchased separately.
Where do I secure the triangle corner hold down socket on the setup board of my Pantograph?
The hold down socket is to be placed in the back left corner of the set-up. This does not get secured down until your router adaptor plate is centered on your workpiece. Please note that the position of this hold down socket will change with each workpiece.
Do you offer additional fonts for the SignCrafter and SignPro?
Unfortunately, we do not offer additional font templates at this time. However, there is a product that can do other sizes and fonts. It is called the PantographPRO.
A pantograph works from tracing a paper stencil (1 character at a time) rather than being guided directly by a group of templates, as with the SignPro or SignCrafter. This gives the user unlimited font capabilities.
Do you offer vertical letter templates?
Currently, Milescraft only makes vertical number templates that can be purchased as a set. The set includes 1-1/2″ and 2-1/2″ number templates.
While we do not manufacture vertical letters, there is a router forum that outlines a process on how to create your own set up to do this. With this modification, you will be able to create vertical signs.
Please visit the following link for more information: http://www.routerforums.com/sign-making/11165-vertical-sign-making-2.html