SKU: 1212/1262

SignPRO™

Create custom wood-engraved signs with the SignPRO™ Sign Making Router Jig


(40 customer reviews)

$87.99

View Replacement Parts
<< Back
SignPRO™ - Replacement Parts

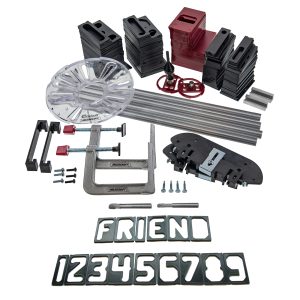
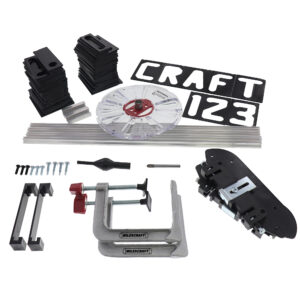
Rout professional-quality wooden signs with the Milescraft® SignPRO™. This jig uses both 1-1/2” and 2-1/2” characters without having to make any measurements. Simply arrange your sign by sliding the letters and numbers between the two rails and you are all set. The versatile design of the entire kit works with your existing router. Whether creating signs for the cabin, marking hiking trails, or numbering mail box posts, this jig makes it easy to create custom signs.

Guide Bushings

  • Durable 5/8″ and 7/16″ guide bushings maintain consistent alignment with any router template
  • Bushing guides you through the router stencils to create great-looking signs
  • Metal nose guide bushing provides long-lasting durability

TurnLock™ BasePlate, Router Accessory

  • 7″ TurnLock™ BasePlate fits most popular routers
  • Made of clear  polycarbonate for visibility of the work area
  • Can be modified with a drill or file to fit nonstandard routers
  • Allows you to change your bushing size quickly with no tools needed

Equipped with the patented TurnLock™ Technology

  • Fast tool-free guide bushing and router attachment exchanges
  • TurnLock™ base plate accepts all Milescraft bushings

SignPRO™ Router Templates (206 pcs. total)

  • 2-1/2″ character templates included
    •  A to Z plus one additional A, E, and I  (2 each)
    •  0 to 9 (2 each)
    •  period and quotation mark (2 each)
  • 1-1/2″ horizontal character templates included:
    •  A to Z plus one additional A, E, and I (2 each)
    •  0 to 9 (2 each)
    • period/apostrophe, dash and blank spacer template (2 each)
  • Vertical number templates included:
    • 1-1/2″ templates – 0 to 9 (2 each)
    • 2-1/2″ templates – 0 to 9 (2 each)

Low Profile C-Clamps

  • Securely hold the workpiece without obstructing the router
*When using this router template guide, be sure that the bushing Is installed on the BasePlate before routing

Stay informed on our newest Sign Making products.
Register below to receive new product updates.

Is my compact/palm/trim router compatible with the base plate?

Is my compact/palm/trim router compatible with the base plate?

TurnLock Base plate compatibility chart and template.


Compatible Compact/Palm/Trim Routers:

Bosch/Colt PR20EVSPK
Bosch GFK125CE
DeWalt DCW600B
DeWalt DWE6000
DeWalt DWP611
Ridgid R2401
Ridgid R24012
Ridgid R86044B
Ridgid R860443B
Ryobi P601

Not compatible w/o plunge attachment:

Makita RT0700C (requires a plunge attachment for installation on the base plate)
Makita RT0701C (requires a plunge attachment for installation on the base plate)
Makita XTR01 (requires a plunge attachment for installation on the base plate)
Bosch/Colt PR20EVS (requires a plunge attachment for installation on the base plate)
Milwaukee 2723-20 (requires Milwaukee plunge attachment 48-10-5601, will align with slots I and E.).

Not compatible:

Porter Cable PC450
Bauer 19121E-B

Specs

  • Includes:

    Self-spacing character templates: 2 sets of 2-1/2″ horizontal characters, 2 sets of 1-1/2″ horizontal characters, 2 sets of 2-1/2″ vertical numbers 0 to 9, 2 sets of 1-1/2″ vertical numbers 0 to 9, (Templates – 206 pcs. total)
    One – 3/8″ carbide tipped router bit
    One – 1/4″ tungsten carbide router bit
    One – 5/8″ metal nose bushing
    One – 7/16″ metal nose bushing
    Four – 18″ metal rails with joiners
    Two – end caps
    Two – low profile c-clamps, to permit easy passage of the router
    One – 7″ TurnLock™ BasePlate with 4 mounting screws
    One – 1/4″ and 1/2″ Centering Pin

  • Weight:

    7.92 lbs

Reviews

Anonymous
Anonymous
Verified ownerVerified owner
5/5

Really awesome product for my projects. Thanks

9 months ago
Steven
Steven
Verified ownerVerified owner
5/5

Very nice kit, works as described

10 months ago
Anonymous
Anonymous
Verified ownerVerified owner
5/5

Does a good job

1 year ago
Kenneth Romney
Kenneth Romney
Verified ownerVerified owner
5/5

You sent exactly what I ordered, thanks.

1 year ago
Victor Macias
Victor Macias
Reviewer
4/5
Just received my signpro and have been practicing. The one thing I noticed right away is that there is no room for error. Router bit touches the edge of a letter or number template and you will find y...
Show More
2 years ago
Jim
Jim
Verified ownerVerified owner
4/5

Gave as Christmas gifts so...

2 years ago
John
John
Verified ownerVerified owner
5/5

All items received in excellent condition and on time. Assembled unit and tested. Very pleased with this kit so far as well as the service provided by Milescraft.

2 years ago
joseph southern
joseph southern
Verified ownerVerified owner
5/5

love it. makes making signs easy

3 years ago
Anonymous
Anonymous
Verified ownerVerified owner
4/5

works well

3 years ago
Anonymous
Anonymous
Verified ownerVerified owner
5/5

I am satisfied. Looking forward to using all of the equipment.

3 years ago
Micheal Dobson
Micheal Dobson
Verified ownerVerified owner
5/5

Excellent

3 years ago
Marc B
Marc B
Reviewer
4/5
Very happy with the product. One thing I would like to see is a set of arrow templates. I'm sure many of us are using this product for outdoor recreation areas and arrows are commonplace on signs. "R...
Show More
3 years ago
Terry T.
Terry T.
Verified ownerVerified owner
5/5

This is a great tool. It saves me so much time. And easy to set up

3 years ago
Beekman
Beekman
Verified ownerVerified owner
5/5
I needed to make some signs for our local Open Land Trust. I had never used router templates before, but I’ve worked with tools all my life. I looked into Milescraft and Rockler templates. I wound ...
Show More
3 years ago
Mike Wehrwein
Mike Wehrwein
Verified ownerVerified owner
5/5

Works great - have made many signs - did not experience any of the issues raised in other reviews

4 years ago
Mike F.
Mike F.
Verified ownerVerified owner
4/5

Good product, chewed up a few templates, due to impatience. Reordering was a snap. Wish there was more quick release technology in the product. But, it works as advertised.

4 years ago
Donna
Donna
Verified ownerVerified owner
4/5

The clamps used to hold it down broke upon the first use. Other than that my husband is happy with it. He made a couple of items and says it works well.

4 years ago
Gus W.
Gus W.
Verified ownerVerified owner
5/5

Very Happy

4 years ago
john g.
john g.
Verified ownerVerified owner
5/5

Haven't opened yet. Fast shipping! My friend has one. Can't wait to use

4 years ago
Douglas Vance
Douglas Vance
Verified ownerVerified owner
5/5
Being a complete novice at sign making, I am very pleased with the SignPro. It is simple to assemble and sturdy. So far I have made several signs using different woods and am very satisfied. My only...
Show More
4 years ago
Anonymous
Anonymous
Verified ownerVerified owner
5/5

Think my husband is going to like it. He hasn't had time to play with it yet

4 years ago
dwooten1
dwooten1
Reviewer
5/5
This is a great product. I have made several signs using both size letters. It is easy to set up and get started. And making the signs can be addictive. I am very glad I found this product and this...
Show More
4 years ago
George Clark
George Clark
Verified ownerVerified owner
1/5

It was NOT delivered!

5 years ago
Robert C.
Robert C.
Verified ownerVerified owner
5/5

Fast and easy setup. Was experimenting on scrap lumber in less than 15 minutes.

5 years ago
Joseph D.
Joseph D.
Verified ownerVerified owner
4/5

works well, though the aluminum extrusions are twisted, causing some difficulty in assembling the jig.

5 years ago
anonymous
anonymous
Reviewer
5/5
5 years ago
Donald B.
Donald B.
Verified ownerVerified owner
5/5

Wish there were other fonts available as this is an easy product to use. Additional fonts would greatly expand more uses.

5 years ago
Kenneth Kaplan
Kenneth Kaplan
Verified ownerVerified owner
5/5

Everything I need and an outstanding price

5 years ago
James G.
James G.
Verified ownerVerified owner
5/5
There can't be a simpler way to make a wooden sign. Set up was a breeze, and I made my first sign within 30 minutes. It takes longer to find the letters and place them in the unit than it does to r...
Show More
5 years ago
Thomas Wright
Thomas Wright
Verified ownerVerified owner
5/5

Great product, ordering was easy and delivered on time.

5 years ago
William Dolezal
William Dolezal
Verified ownerVerified owner
5/5

I am very pleased with the product and how fast I received it after the order was placed

5 years ago
JOHN B.
JOHN B.
Verified ownerVerified owner
5/5

Good quality but yet to try it

5 years ago
Anonymous
Anonymous
Verified ownerVerified owner
5/5
5 years ago
Harold
Harold
Verified ownerVerified owner
5/5

Product is great. Fast shipping. Highly recommended

5 years ago
Calvin M.
Calvin M.
Verified ownerVerified owner
5/5
good product, I am a beginner so it does take some time for trial & error to get it to work. you have to go slow the plastic parts tend to fall out of place if you go too fast. but work awesome when ...
Show More
5 years ago
RayLawrenceJr
RayLawrenceJr
Reviewer
5/5
If you want to get addicted to making sawdust and making signs and having lots of fun with wood, this is a great starting point. If you like those state park signs and want to make your own versions o...
Show More
5 years ago
anonymous
anonymous
Reviewer
4/5
Overall is a pretty good product but a couple of items to be aware of. The kit i received had only 2 1.5" N stencils and took some shuffling and resetting to use. The other issue is the font, it lo...
Show More
5 years ago
Grant Bergeron
Grant Bergeron
Reviewer
3/5
Only used 1.5" letters Great customer service, the original letter "N" that came with a new kit is "Old Style" is backward and larger than others. Jessica Randall in customer service is sending the ...
Show More
6 years ago
Radek
Radek
Reviewer
4/5
In the box one will find everything that is needed to rout text in wood. There is a limitation, only one type of font in two sizes: 1.5” and 2.5". All one needs to have is a router with 1/4" collet. ...
Show More
7 years ago
James Meyer
James Meyer
Reviewer
5/5

The sign making kit is fun. Everyone likes to get a gift of their name engraved in wood.

8 years ago

40 reviews for SignPRO™

4.6 Rating
1-5 of 40 reviews
  1. Really awesome product for my projects. Thanks

  2. Very nice kit, works as described

  3. Does a good job

  4. You sent exactly what I ordered, thanks.

  5. Just received my signpro and have been practicing. The one thing I noticed right away is that there is no room for error. Router bit touches the edge of a letter or number template and you will find yourself ordering a new set. Wish the template were a little more stronger (thicker). The other thing is don’t over tighten the adjustable spacer to the template or the template will bend when routing.

    Guess I’ll practice some more, slow it down and order an additional template set.

Add a review
SignPRO™ SignPRO™
Rating*
0/5
* Rating is required
Your review
* Review is required
Name
* Name is required
* Please confirm that you are not a robot

FAQs

Can I modify the base plate to fit my router?

In some instances, NOT ALL holes in the router’s base will match the mounting pattern. Only two diagonal holes matched to a router’s base are required (as a minimum) for proper installation and operation. You may decide to modify an existing slot or add hole(s) to better suit your router. The screws supplied may not fit your router. If you supply your own screws, DO NOT use “countersink” head styles.


Is my compact/palm/trim router compatible with the base plate?

TurnLock Base plate compatibility chart and template.


Compatible Compact/Palm/Trim Routers:

Bosch/Colt PR20EVSPK
Bosch GFK125CE
DeWalt DCW600B
DeWalt DWE6000
DeWalt DWP611
Ridgid R2401
Ridgid R24012
Ridgid R86044B
Ridgid R860443B
Ryobi P601

Not compatible w/o plunge attachment:

Makita RT0700C (requires a plunge attachment for installation on the base plate)
Makita RT0701C (requires a plunge attachment for installation on the base plate)
Makita XTR01 (requires a plunge attachment for installation on the base plate)
Bosch/Colt PR20EVS (requires a plunge attachment for installation on the base plate)
Milwaukee 2723-20 (requires Milwaukee plunge attachment 48-10-5601, will align with slots I and E.).

Not compatible:

Porter Cable PC450
Bauer 19121E-B

Is the Ryobi One+ compatible with the base plate?

Yes, the Ryobi One+ P601 is compatible with the #30681 TurnLock Base Plate. This Ryobi router does not require special screws.


Can I make my own templates for the SignCrafter™ & SignPRO™?

You can create your own templates by purchasing material and cutting it out.

The material you will need to purchase is a polycarbonate material that is 3/32” thick x 4” wide and will need to be cut down to 3-1/4” to fit into the frame of the jig.

You will then need to draw or stencil the desired character onto the material and then cut it out. This will allow you to create a character to your desired height.

Do I have to use a plunge base router with the SignCrafter™ or SignPRO™?

It is not required to use a plunge base router with this kit. Below you will find information on using both types of routers so you can see the difference in operation.

If using a fixed base router:
Lower router bushing into letter opening. With bushing in contact with the inside of letter opening and router bit above wood (NOT TOUCHING), start router motor. Lower bit into the wood until router base is resting on both rails. The router bushing traces around the letter opening. When the letter is complete, turn the router off. When the motor stops, remove router. Proceed to engrave all letters in the template assembly.

If using a plunge router:

Lower router bushing into letter opening. With bushing in contact with the inside of letter opening and router bit above wood (NOT TOUCHING), start router motor. Lower bit into the wood. The router bushing traces around the letter opening. When the letter is complete, raise router bit. Stop the router motor. Proceed to engrave all letters in the template assembly.

How do I keep my letters from falling out of the rails?

It is recommended that you use a support bridge even with signs that are 18” or less. You may also find it beneficial to clamp down the support bridge to ensure that the letter templates do not come lose while you are routing.


How do I make signs that stand out?
  • If you are painting your sign, almost any wood species will do
  • For clear finished signs, laminate two contrasting wood species, such as padauk-on-maple (best for indoor use)
  • For outdoor signs, choose cedar, redwood, or white oak (these species resist rot)
  • After routing signs, use spray paint for a quick way to add contrast, plane or sand after the paint dries
  • Don’t apply a clear-film finish to outdoor signs; the sun’s ultraviolet rays will cause it to discolor and peel
  • Use pigmented deck finish or leave outdoor signs bare and allow it to weather naturally
How do I paint or finish my signs?

Painting or Finishing Signs – Helpful Hints:

1:

Spray paint the entire workpiece after it has been routed. After the paint is dry, sanding the entire sign with a belt sander will remove the paint from the high spots and leave paint in the areas that have been routed. Be sure to sand the workpiece evenly.

2:

Place Tuck Tape, or another sheathing tape, over the surface that you want to rout out. The router cuts through the tape and into the workpiece. After routing is complete, spray paint over the lettering, (usually two coats) and once dry, remove the tape. This can be done with the help of a shop knife or Exacto blade. This method cuts down on sanding.

How do I prevent the spread of sawdust when using my router?

If your router comes with a dust deflector, we recommend installing this before routing. It may also be helpful to install a dust collection adapter on your router, should this accessory be available for your particular brand/model number.


Can I modify the base plate to fit my router?

In some instances, NOT ALL holes in the router’s base will match the mounting pattern. Only two diagonal holes matched to a router’s base are required (as a minimum) for proper installation and operation. You may decide to modify an existing slot or add hole(s) to better suit your router. The screws supplied may not fit your router. If you supply your own screws, DO NOT use “countersink” head styles.


Is my compact/palm/trim router compatible with the base plate?

TurnLock Base plate compatibility chart and template.


Compatible Compact/Palm/Trim Routers:

Bosch/Colt PR20EVSPK
Bosch GFK125CE
DeWalt DCW600B
DeWalt DWE6000
DeWalt DWP611
Ridgid R2401
Ridgid R24012
Ridgid R86044B
Ridgid R860443B
Ryobi P601

Not compatible w/o plunge attachment:

Makita RT0700C (requires a plunge attachment for installation on the base plate)
Makita RT0701C (requires a plunge attachment for installation on the base plate)
Makita XTR01 (requires a plunge attachment for installation on the base plate)
Bosch/Colt PR20EVS (requires a plunge attachment for installation on the base plate)
Milwaukee 2723-20 (requires Milwaukee plunge attachment 48-10-5601, will align with slots I and E.).

Not compatible:

Porter Cable PC450
Bauer 19121E-B

Is the Ryobi One+ compatible with the base plate?

Yes, the Ryobi One+ P601 is compatible with the #30681 TurnLock Base Plate. This Ryobi router does not require special screws.


Can I make my own templates for the SignCrafter™ & SignPRO™?

You can create your own templates by purchasing material and cutting it out.

The material you will need to purchase is a polycarbonate material that is 3/32” thick x 4” wide and will need to be cut down to 3-1/4” to fit into the frame of the jig.

You will then need to draw or stencil the desired character onto the material and then cut it out. This will allow you to create a character to your desired height.

Do I have to use a plunge base router with the SignCrafter™ or SignPRO™?

It is not required to use a plunge base router with this kit. Below you will find information on using both types of routers so you can see the difference in operation.

If using a fixed base router:
Lower router bushing into letter opening. With bushing in contact with the inside of letter opening and router bit above wood (NOT TOUCHING), start router motor. Lower bit into the wood until router base is resting on both rails. The router bushing traces around the letter opening. When the letter is complete, turn the router off. When the motor stops, remove router. Proceed to engrave all letters in the template assembly.

If using a plunge router:

Lower router bushing into letter opening. With bushing in contact with the inside of letter opening and router bit above wood (NOT TOUCHING), start router motor. Lower bit into the wood. The router bushing traces around the letter opening. When the letter is complete, raise router bit. Stop the router motor. Proceed to engrave all letters in the template assembly.

How do I keep my letters from falling out of the rails?

It is recommended that you use a support bridge even with signs that are 18” or less. You may also find it beneficial to clamp down the support bridge to ensure that the letter templates do not come lose while you are routing.


How do I make signs that stand out?

  • If you are painting your sign, almost any wood species will do
  • For clear finished signs, laminate two contrasting wood species, such as padauk-on-maple (best for indoor use)
  • For outdoor signs, choose cedar, redwood, or white oak (these species resist rot)
  • After routing signs, use spray paint for a quick way to add contrast, plane or sand after the paint dries
  • Don’t apply a clear-film finish to outdoor signs; the sun’s ultraviolet rays will cause it to discolor and peel
  • Use pigmented deck finish or leave outdoor signs bare and allow it to weather naturally

How do I paint or finish my signs?

Painting or Finishing Signs – Helpful Hints:

1:

Spray paint the entire workpiece after it has been routed. After the paint is dry, sanding the entire sign with a belt sander will remove the paint from the high spots and leave paint in the areas that have been routed. Be sure to sand the workpiece evenly.

2:

Place Tuck Tape, or another sheathing tape, over the surface that you want to rout out. The router cuts through the tape and into the workpiece. After routing is complete, spray paint over the lettering, (usually two coats) and once dry, remove the tape. This can be done with the help of a shop knife or Exacto blade. This method cuts down on sanding.

How do I prevent the spread of sawdust when using my router?

If your router comes with a dust deflector, we recommend installing this before routing. It may also be helpful to install a dust collection adapter on your router, should this accessory be available for your particular brand/model number.